How to Implement Custom Personalization rule in Sitecore
How to Implement Custom Personalization rule in Sitecore
To fulfill business needs sitecore provides many different personalization rules out of the box that can be applied on different components, however there might be cases where we have to write our custom rule or logic's to fulfill client business requirements. Sitecore architecture support this scenario very well.
in this blog, we will create a custom rule in which based on query string parameter we will show different content to our website visitors.
Use-Case : we would like to show component based upon the value of query string parameter "country". below is the steps to achieve this.
Step-1 : Register the Tag
Create a new Custom Tag for custom rule at this path /sitecore/system/Settings/Rules/Definitions/Tags. for the reference i have attached the screenshot below
Step-2 : Register new Element for rule
Create a new Custom element folder and personalization condition at this path /sitecore/system/Settings/Rules/Definitions/Elements
Step-3: Create condition for the rule.
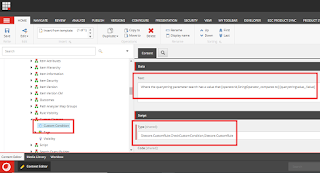
right click onto the custom element item and insert new condition , screenshot is attached for reference.
now in this custom condition, you have to set two fields which is discussed below
1. Text : text field contains the text that we are going to present to content author while applying this condition on any component with Rule Engine.
As per our use case, we will use below text in Text field:
Where the querystring parameter search has a value that [operatorid,StringOperator,,compares to] [querystringvalue,,,Value]
everything under [] will be replaced by rule engine as selectors. below is short description the format used in above
Step-4: assign custom tag created in step 1 to default element tag definition.
Step-7: below is the class which implements the custom logic for the rule
in the above code snippet we can see that we have create a class CheckCustomCondition which inherit StringOperatorCondition class and override Execute(T ruleContext) method which is of the type bool.
we are trying to compare the query string value that has been configured in rule editor and what has been actually entered by end user.
if the the parameter matches the Execute method will return true which means rule is satisfied and personalized component will be displayed else it will show default component.
Note: The class logic is simple and not doing much for the purposes of the demo. In a real world scenario you can make a rule that reads from a custom database, read a configuration file, call an external API (be careful with this as it will increase page load time).
Similarly we can create other custom rules to show more relevant and targeted content to our end users based on how they have interacted and what details they have stored in the system (internal/external).
- OperatorId, defines the public property of the class where we want to assign the value coming from the content author input
- StringOperator, the built-in macro that we want to use to get the input from the user. In this case this will be a string comparation operation
- blank, this parameter will depend on the type of macro that we use, this could be a default text value if we are using the default macro, it could be a default start path if we’re using the Tree macro – think of it like setting a field source when we’re building a template in Sitecore. A full list of macros can be found in /sitecore/system/Settings/Rules/Definitions/Macros
- compares to, the last parameter is the text representation that we want to show to the content author, this value is clickable and when clicked Sitecore will display the appropriate input control based on the macro that we set on the second parameter
Step-4: assign custom tag created in step 1 to default element tag definition.
Of course we can assign our custom element tag definition to one of the existing tag under /sitecore/system/Settings/Rules/Definitions/Tags so that it will automatically appear on the content author personalization rule window however if you want to make it obvious which one is your custom ones then I recommend creating your own custom tag and assign it to that.
Step-5: now we have to add this tag to conditional rendering so that new rule is available in the rule editor for content authors to personalize the component using experience editor or content editor.
Step-6: now after step 5 the new custom rule is ready for use, go the particular component personalization section and choose the new rule. below is screenshot for reference.
in the above code snippet we can see that we have create a class CheckCustomCondition which inherit StringOperatorCondition class and override Execute(T ruleContext) method which is of the type bool.
we are trying to compare the query string value that has been configured in rule editor and what has been actually entered by end user.
if the the parameter matches the Execute method will return true which means rule is satisfied and personalized component will be displayed else it will show default component.
Note: The class logic is simple and not doing much for the purposes of the demo. In a real world scenario you can make a rule that reads from a custom database, read a configuration file, call an external API (be careful with this as it will increase page load time).
Similarly we can create other custom rules to show more relevant and targeted content to our end users based on how they have interacted and what details they have stored in the system (internal/external).


Comments
Post a Comment